Category Archives: AECT (2012) Standard 3 (Learning Environments):

• Creating
• Using
• Assessing/Evaluating
• Managing
• Ethics
• Diversity of Learners

ET 513 Week 16 “e-Learning Strategies for F2F Classrooms”

Wow, it’s been a fast 16 weeks! This class was exceptionally useful, and I look forward to applying the Multimedia Principles to my future presentations & updating some of my old presentations! I will have a busy summer!

Below is my final assignment.

This class has been super useful for me in terms of learning the Multimedia Principles and then attempting to implement the Principles all while learning some new technology tools. I always love when I create projects for my grad class that I can use in the classes that I teach. I have used several of the artifacts for this class in my face to face (F2F) classroom.

I teach in a F2F suburban public high school. My classroom has a set of Chromebooks, so in my projects for this class I tried to use tools that my students could use on the Chromebooks. I am looking forward to implementing both some of the Multimedia Principles in my own presentations, and using some tools.

In particular, I plan to update my presentations using the Multimedia Principles. I have slowly started to do this.

Here is an example of my Google Slide Presentation on Newton’s Laws prior to learning about the MultiMedia Principles. As you can see, I broke almost all of the principles; so many words and so many slides! Since taking this class, I have broken the presentation into several shorter presentations (Segmenting Principle). Additionally, I have added images (Multi Media Principle) and reduced the amount of words on each page (Modality Principle), where I do have words I try to reduce the amount of words. I have updated my speaker notes & the speaker notes are used with the images (Redundancy principle). See Below links to presentations. I am considering adding narration for a fully flipped environment. 

Updated Presentations by topic: What is a Force?The Three Laws (these are the first two updated presentations).

The thing that I am most excited about trying is using the narration tools  that I learned about to create Flipped Presentations.  I would like to try creating some narrated presentations either with Prezi or using my SmartBoard recorder. I have been looking for a way to record presentations, and am so glad that I finally figured out that I can record from the SmartBoard. This will be particularly useful in terms of solving Physics problems. For last week’s assignment, I created a faded worked example on how to solve horizontally launched projectile problems. It was very timely, as I  am using it this week in my classes!

Last, but not least, I will introduce some of these tools to my students, and will hopefully have them create some multimedia presentations as well. I usually have them create a couple presentations throughout the year, but I think I may add narration to at least one! I currently use Google Classroom, and post all of my assignments, presentations, worksheets, etc, but I am still trying to figure out the best way to organize the information so as not to overwhelm students. I find the Google Classroom feed can sometimes seem very long for students who are searching for old assignments (I do use the topic tool, but still lots of information for students!). The last student project that I would like to try is the creation of website for students to showcase their learning. I most likely will use Google Sites since we are a Google Classroom school and it will be easy in terms of sign on, etc.

This class was very useful in terms of learning how to improve my presentations & how to use some new tools. I am looking forward to implementing what I have learned. I think I will have a busy summer creating & updating my presentations!

Old Presentation

Updated Presentation (broken into several shorter presentations, here is the first and second in a series on Forces)

ET 513 Project #8 Worked Example ScreenCast

I was so excited for this project, as I have been trying to figure out how to create a video for a flipped classroom. I have been talking with IT at my school and other teachers, but none of us knew that we could record using our Smart Boards! Sounds unbelievable, but it is true!

Dr Hall suggested that it was very easy to record on a Smart Board, so like many when trying to find out how to do something, I “googled” how to use the Smart Board recorder. It is incredibly easy. I ended up creating a Google Slide presentation, and used that as my screen cast.

The hardest part was limiting the text to only what is necessary! I had a script, but found I kept ad libbing as I was solving the problems. This took a few takes, but finally I think I had it. I did find one physics error in the narration at about 2:20, and I mentioned that in the comments on You Tube. For my topic, I chose to solve three horizontally launched projectile problems, which can be quite time consuming. The finished product is about 20 minutes, longer than I would like, but it again, solving projectile problems take TIME to solve these problems. I included a link to the original Google Slide presentation as my transcript is in the “notes” section. I also had You Tube add the closed captions, but there are some errors in translating form my Boston accent to the closed captions. Again, I “googled”how to fix the closed captions, and it was relatively quick!

I realize that on my last solved problem, I must NOT have hit play, and I  do not read the problem, just give the students a chance to solve & then do a quick explanation if needed.

While creating this video was relatively easy, I think that I will need to practice to get “good” at these, but I will definitely make more of these videos; they are prefect for Physics, as it requires practice to solve problems. I have been looking for a way to create videos for “flipping my class”, and there are several good websites Flipping Physics and Kahn Academy, but I have read that students prefer videos in their teachers’ voice. So I   plan to create a series of videos going forward (now that I know how!). I will use this video in the next couple of weeks, and get feedback from my students. I will still give my students the links for Flipping Physics & Kahn Academy if they would like to use those for a review, but will also have my own toolkit of videos!

Here is a link to the original Google Slide Presentation, the transcript is in the notes section for each page.

ET 513 Project #6 Digital Story

Over the past couple of weeks, we read about the Personalization Principle, which states that Multi Media Presentations should use conversational style language and virtual coaches to help students feel connected to the learning.

We also learned about Digital Stories. According to Wikipedia,  digital storytelling is an emerging term, a form of storytelling that uses digital tools to enable “ordinary people” to tell their stories in an “emotionally and compelling form.”  According to University of Houston, “Digital storytelling at its most basic core is the practice of using computer-based tools to tell stories. There are a wealth of other terms used to describe this practice…; but in general, they all revolve around the idea of combining the art of telling stories with a variety of multimedia, including graphics, audio, video, and Web publishing.”

For my Digital Story this week, I decided to step away from Physics, and create a digital story about the Gals for Cal Triathlon team, a team which means the world to me. I next needed to decide what tool to use. I think that finding the right tool is always one of the hardest parts of my Ed Tech projects. There are so many from which to choose, and I always want to try tools that I think are simple to use, and are tools that my students could potentially use. We have Chromebooks at our school, so I tried to use tools that were Chromebook friendly.

I chose Emaze for the presentation. I tried to adhere to the Personalization principle by using a conversational style. No need for a virtual coach in the story (although I could use a triathlon virtual coach!) I think it is an easy to use tool, and it allows for audio uploads. I downloaded music through Sound Cloud for the music. For the spoken narration, I tried several options such as the Chrome Extension Simple Audio Recorder, my iphone, and more, but the files were in the wrong format. I finally settled on Vocaroo because it is so easy to create and download the audio files with Vocaroo. The quality is not as good as some others, but the ease of use far outweighs the negatives!

Creating the slide show and audio was a fun process. I kept running into problems with timing and some of the audio was not playing correctly. I eventually worked it out, and below is the link to the Gals for Cal, The Reason I Tri. I could not get the embed code to work in WordPress, below are links.

Here is the autoplay link to my Emaze.  (or with link manual start and ability to page forward)

Here is a link to the transcript.

Click on the image to go to the Emaze Presentation

Tri like a gal

References

What is Digital Story Telling, (2017), University Of Houston, Education, Retrieved from http://digitalstorytelling.coe.uh.edu/page.cfm?id=27&cid=27


ET 513 week10 “Project # 5: Coherence Analysis.”

As I read about the Coherence Principle two things immediately popped into my head. First, the 1976 cookbook “More with Less” , and second, one of my favorite sayings…”KIS” or Keep it Simple!

Doris_Janzen_Longacre_-_More-With-Less_Cookbook

The Coherence Principle states “adding extraneous material can hurt learning”. The Coherence Principle has three main points:

  1. Avoid extraneous audio
  2. Avoid extraneous graphics
  3. Avoid extraneous words or text

While at first glance it might seem like a good idea to add sound, graphics, or words to a multimedia presentation to “spice it up” and make it more interesting, studies show that the extra content interferes with the cognitive process of creating a model in working memory. The Coherence Principle makes sense when you look at it from the perspective of the learning goals, instructional designers should “avoid anything that does not support the instructional goal.” (Clark, 2008, p. 151)

A poor example of the Coherence Principle is found in figure 8.1 in the text (p. 152). The designer added additional interesting information about the history of spreadsheet software. However, adding this information breaks the Coherence Principle. The goal of the instruction is to learn how to use a spreadsheet software & the history is NOT part of the goal. This added information while it is interesting & nice to know, is irrelevant to the learning goal & may in fact interfere with the student’s’ working memory. The added information can overload working memory with irrelevant information & hinder a student’s ability to create their own model in working memory.

Another example is seen here in one of my own classroom presentations. This images is from a presentation oNewtons_laws REV 2016-2017.pptx (2)
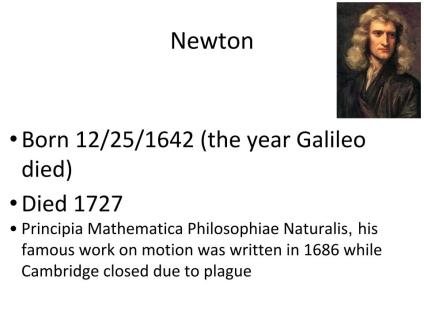
n Newton’s Laws of Motion. The information on the slide is “nice to know”, but is not necessary to the learning how to apply the three Laws of Motion. I have taken this slide out of the presentation because it is irrelevant text that is not necessary to learning the three Laws of Motion.


A better example of the Coherence Principle from my own classroom2_FBD's & Equilibrium is the slide to the right. The slide does not have any extra sound, graphics, or text.The narration is simple: “To resolve a Force vector into its components, follow the rules for vector resolution.  The horizontal component is F times cosine theta & the Vertical Component is F times sine theta.


The Coherence Principle is a natural extension of the other Multi Media Principles. The principles that we have learned about are:

  1. Multimedia: use images (graphics, animations) along with words.
  2. Contiguity: Align text with corresponding images.
  3. Modality: Present words as audio rather than text
  4. Redundancy: Explain graphics with narration (preferably…Modality) or text, but NOT both.
  5. Coherence: Avoid extraneous audio, graphics, words.

To me, all the principles work together and suggest that the best multimedia presentations limit the information to what will achieve the learning goals. The principles all point to maximizing the dual channels of audio & visual, and recommend ways to limit overload in working memory by using: images with relevant narration (or text) in order to maximize a learner’s’ ability to process the information in working memory. As I create future presentations,  and rework old presentations I am going constantly remind myself that less is more!

Clark & Mayer explain that people learn when “a change occurs” that is personal and this change occurs in within the learner’s information processing system. (p 33).  The Coherence Principle paves the way for the learning to occur as the Principle supports limiting the amount and type of information that goes into the working memory to process & create meaning.

I personally find this principle very applicable (although I need to practice employing it more often!). It makes perfect sense to me to limit information so students can process the key ideas. This class has really opened my eyes, and I can see in my own classroom how I sometimes (OK, often) embellish presentations with “nice to know”, but not “need to know” information. I have gone back to some of my presentations as a result of this class and reduced the content on each slide, maximized images with clear narrations, and have taken out information that is “fluff”. I know there is still more to learn, but I am looking forward to the chance to apply these principles in my own teaching.

One of the challenges of the Coherence Principle is to “stimulate interest without adding extraneous material that distracts from the cognitive objectives of the lesson.” (Clark, 2008, p, 173). One thing that I enjoy about this text is that the authors explain how research supports the Multi Media Principles, but also explain that additional research is needed to delve into other questions including how do the principles affect more advanced learners? Anecdotally, I can see how the Multi Media Principles that we have learned about are very powerful for novice learners. I can see that in my two different sections of Physics Honors vs College Prep (CP), the Honors students tend to come to class with more background knowledge in Physics & Math. I observe that when I limit the amount information (Coherence Principle), my CP students seem to “pick up” the ideas more easily. The challenge now for me will be to update the multimedia & employ more of the Principles. Again, I do not have hard evidence, just my anecdotal observations but based on this class & my observations, I plan to employ more of these Principles as I rework my curriculum this summer.

References

Clark, R. C., & Mayer, R. E. (2008). E-learning and the science of instruction, 3rd edition. Pfeiffer: San Francisco, CA.

Image Credit:  Doris Janzen Longacre – More-With-Less Cookbook. retrieved from: https://en.wikipedia.org/w/index.php?curid=38805641

ET513 Week7 Project #3Haiku Deck

Continue reading

ET 513 SketchNote project #1 Weeks 4/5

Background: In weeks four and five, we read chapters four & five from “ELearning and the Science of Instruction”, and created our Sketchnote Project. First, I am so glad to have read chapters four and five. It sheds some more light on some of my peers’ week three projects! Our week three assignment was to post on good and bad course ware, and many people included the elearning Principles in their posts. Chapters four and five introduce the Multimedia Principle & the Contiguity Principle. Some of my peers (in other classes) have also included the elearning Principles, so I am glad to finally be learning about & understanding the elearning Principles!

Sketchnotes: First thoughts… I was excited & apprehensive to try creating my own Sketchnote. I have seen some pretty amazing examples of Sketchnotes, and I think they are cool ways to connect with information. As I read about & watched tutorials on Sketchnotes, I can see how some of my students could really benefit from the process. In fact, recently, a student who is struggling in class came to see me, and we talked about how the Sketchnotes process might help her.

I was apprehensive because I have messy handwriting, and my drawing skills are minimal, but I definitely wanted to try it!

Challenge: Choosing a tool… My next challenge  was decide whether to go “old school” and draw with paper & pencil or try a  “21st century” web 2.00 tool. I do not own an Ipad, and drawing and writing on my small Iphone screen is extremely challenging. Additionally, I wanted to mimic what my students might be doing. At our school we have access to Chromebooks (without touchscreens) so  I decided to search for sketchnoting tools for Chromebooks. I found some that seemed promising, but drawing (and writing) w/ a mouse is very difficult. In fact, it looks like “chicken scratch”! I thought about using an infographic tool like Piktochart, but I think using a tool like that defeats the purpose of Sketchnotes. To me, Sketchnotes should capture the ideas that stand out “in the moment”. I think Piktochart is a great tool for creating “more polished” presentations, but I do not think tools such as Piktochart allow for the “in the moment” flow of ideas.

So I searched for ChromeBook apps…Some of the tools that I explored include:

AwwApp: This allowed me to type words and add images. But I found that it did not allow for free flow in the moment (which I think is key for Sketchnotes). Additionally, deleting items proved more difficult than just a simple “undo” button. If I had a touch screen, I think it would have been more user friendly. Here is a screen shot of my attempts at AwwApp.

screenshot-2017-02-09-at-12-04-06-pm

Explain Everything: This is a very cool tool, and I want to explore it further (if and when I get a touch screen). I think it would be another avenue for creating presentations for not only me, but also my students. Here is my  image of “playing with this app”.

et-513-test-for-week-4-w-explain-everything

Above is evidence that writing and drawing with a mouse is almost impossible for me! 🙂

Pixlr, I did not find this tool intuitive, and the icons were so small, I could barely see them! (even with my glasses!). Here is my screenshot with Pixlr.

screenshot-2017-02-09-at-12-18-04-pm

Sketchboard: I actually like this app. On glitch was that I couldn’t figure out how to rotate the arrows (which bothered me), but I think this could be useful once I play with it some more. Here is my screenshot of using Sketchboard App.

screenshot-2017-02-09-at-12-09-18-pm

Final Product: I ultimately decided on “old fashioned” paper and pencil. The next challenge was finding a way to upload the project. While doing it by hand allowed my thoughts to flow freely, it was challenging when I wanted to change things. The BIGGEST challenge was making it legible (did I mention that I have messy handwriting?!?) I ended up making four pages of sketchnotes on chapter four;  I enjoyed the process, and wanted to keep trying.

Uploading Challenges: I tried scanning on my printer at home, but it was “too light” so I needed to make the words & drawings darker, and then re-scan. They were still hard to view, so I scanned on the photocopy machines at work & saved as PDFs.  The PDFs are easy to read, but I can’t figure out how to embed a PDF into WordPress (so the PDF links are at the bottom of this page). The Jpegs are below.

Final Thoughts: I would like to introduce this to my students, as I think some students would benefit from it. One thing I realized in this process is that I am rather textual in my approach to notes, but I have always done a very basic version of this in my notetaking as I have certain images & symbols that I use as a sort of shorthand when I take notes.

Below are the JPegs from my home printer/scanner.

page-1

Page One Overview of MM

page-2

Page Two Image Types

page-3

Page Three: Constructing Meaning

page-4

Page Four Novice vs Advanced learners

Below are  PDFs  (from the photocopy scan) of my sketchnotes.

Page One: week4-5-p1_3

Page Two: week4-5-p2_3

Page Three: week4-5-p3_3

Page Four: week4-5-p4

ET505 Week 11

This week, we reviewed all the readings: The ABC’s of Evaluation (chapters 1-9) plus all the internet readings. Here is my review/recap of the information in a Prezi presentation.

ET505 week 10

This week’s assignment was to read chapter 8 from ABC’s of Evaluation. I answered question on p 184 two part exercise “How do I determine if my project is research or evaluation?”  We also explored the “sampling” process. I reviewed a couple of videos, and included my response in the weekly assignment. I submitted an alternative assignment and created an Emaze presentation to explore the question.

ET505 week 9

This week I chose to do an alternate submission, and created a Prezi. The assignment was to read chapter 6 from the ABC’s of Evaluation, and complete the questions on p 141, as well as continue working on our evaluation project. Here is the link to my Prezi.